Operating rules and step-by-step instructions with photographs for replacing brake fluid in a car. What a newbie car owner needs to know: replacement frequency and read the tips, read here.

This procedure is not complicated, but it requires an additional assistant who will press the brake pedal at your command. The procedure for replacing the brake fluid was carried out on a VAZ 2110 car, but according to this scheme it can be done on any other vehicle.
What you need to know:
- Only use the brake fluid specified by the car manufacturer.
- When refilling, you need to use only new fluid and only the one that matches the old one. In no case, do not fill in a liquid that has already been used previously, as it will contain all sorts of contaminants, impurities and oxides.
- When working with this liquid, you need to be very careful and careful, as it is very toxic. Never try to suck up brake fluid by mouth. Store it only in a container, excluding general access to it. When working with it, you should always have clean rags on hand, since if they get on the car body or other plastic parts, they may be damaged. If, nevertheless, a chemical liquid gets on the above-mentioned parts, then in this case they must be rinsed with water and cleaned with a rag.
- Do not allow brake fluid to come into contact with mineral oils. Even minuscule traces of mineral oil can render the brake fluid ineffective and damage the entire brake system. System gaskets and cuffs can be damaged if they come into contact with products that contain mineral oils.
- Rags saturated with mineral oils are not used for cleaning system elements.
The liquid tends to absorb moisture from the environment and therefore must always be closed. - The frequency of replacing the brake fluid is once every 2-3 years, regardless of the mileage traveled. Or if the car has traveled about 50-60 thousand kilometers, then it should also be changed. Replacing the brake fluid is advised to be carried out after the cold season.
Liquid is food that should not be thrown away or thrown away with everyday waste.
Replacing brake fluid - step by step instructions:

1. On the main cylinder you need to find the tank cap and unscrew it. Place the unscrewed cap on a clean surface. Please note that liquid may leak from the float! So it's better to put on an unnecessary rag. 2. If the rear wheels are suspended, then it is necessary to unblock the onslaught of the braking devices by inserting a small object between the piston and the plate. At the end of the brake fluid replacement, remove it.

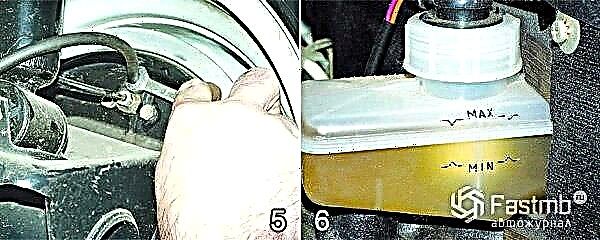
3. Thoroughly clean the exhaust valve on the rear right brake assembly. Remove the protective rubber cap from the valve. For convenience, use a transparent hose that must be pushed onto the fitting and inserted into a suitable container.
4. Here the help of your assistant is needed. Now you can pump the brakes by pressing the brake four or five times with an interval of 1-2 seconds, but after the fifth pitching, do not release the pedal, but simply squeeze it.

5. We unscrew the exhaust valve by half a turn, as a result of which, through the previously installed transparent hose, the old brake fluid should flow. When it stops flowing, you need to quickly tighten the outlet valve.
6. It is also necessary to monitor the amount of brake fluid in the reservoir so that it does not fall below the minimum level "MIN". The actions given in paragraphs 4-5 should be done until a clean (new) brake fluid flows from the brake device, but at the same time monitor the level in the reservoir and constantly add clean fluid.
7. Do the same with the left front (opposite) brake unit. Then you can switch to another pair of brakes, adhering to the same principle - rear left, front right. It is very important to follow the procedure for bleeding the brakes!
8. After the end of the process of replacing the fluid, you need to check the brake pedal for tightness and uniformity. To do this, you need to press the pedal several times and make sure that it has a uniform stroke. When the brake pedal stroke is not smooth and uneven, it means that air has entered your system, then we begin to repeat the actions described earlier, or more accurately read how to bleed the brakes.
9. When filling with new fluid, remember to put the rubber protective caps back on the air vent valves.
10. Return to the reservoir and fill it with brake fluid to the maximum level marked "MAX". That's all, the brake fluid change and the system setup is complete.