Step-by-step procedure for replacing the rear suspension beam on a VAZ 2110 car. Reasons for its breakdown.

The rear suspension beam of the VAZ 2110 is necessary to connect the vehicle's carrier system with the wheels or axles. Moreover, she:
- dampens vertical vibrations of wheels and body, angular vibrations of the body;
- minimizes dynamic loads affecting passengers and cargo in the car;
- in the event of external influences on the car, it transfers the forces and moments that are formed in this case to the wheels and the body.
The main elements of the rear suspension are a connector and two trailing arms, welded together through amplifiers. Other parts are also included in the rear suspension beam.
Causes of suspension beam breakage
During operation, the most common causes of rear suspension breakdown are:
- malfunction of shock absorbers;
- weak fastening of shock absorbers;
- wear of rubber bushings for suspension arms;
- sediment, spring breakage;
- deformation of the levers;
- overload of the rear suspension.

In the event of noise and knocking in the suspension, the car moving away from the straight-line movement, frequent "breakdowns" of the rear suspension, it should be removed and examined to identify a faulty part and its replacement. First, you need to warn that the replacement should be done in a specialized workshop, since replacing worn hinges of the rear suspension arms requires skills and a specialized tool.
It should also be noted that in order to disassemble the beam in the future, in the process of its removal, it is necessary to loosen the tightening of the wheel bolts and hub nuts.
Procedure for replacing the rear suspension beam:
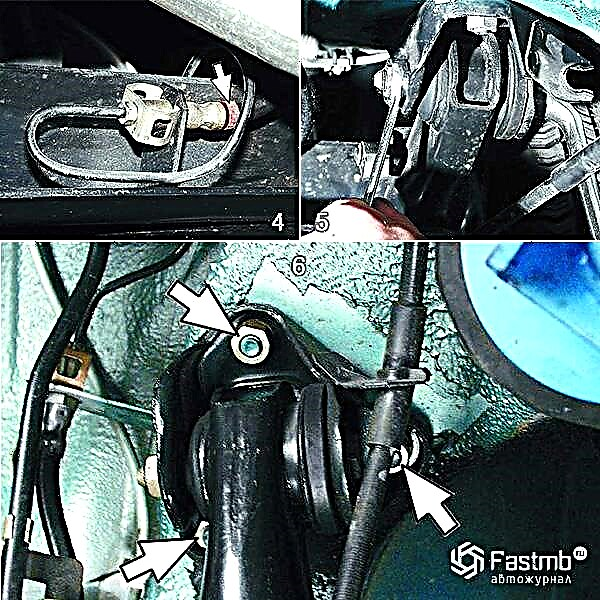
1. The rear shock absorbers must be removed from both sides of the machine.
2. For convenient and comfortable access to the beam securing bolt, disconnect the parking brake cables from the equalizer, then remove the cable sheaths from the bracket on the body. After that, by bending two fastening brackets at each of the cables, you can remove them (cables) from the fastening brackets. 3. Then, on the rear suspension beam from the bracket, we disconnect the shackle of the drive lever that regulates the pressure (pressure regulator).

4. On the beam on both sides of the tubes, disconnect one brake hose at a time, tightly closing their holes.
5. Having unscrewed the nuts from the bolts securing the suspension to the brackets on both sides, knock out the bolts, then roll the beam out from under the car. According to the manufacturer's recommendation, the beam must be removed with the brackets by unscrewing three nuts, but due to long-term operation, the worn out pins may break, so it is safer to disconnect the beam from the brackets remaining on the body.
6. After repair and replacement - the rear suspension is installed in the reverse order to removal.
The final, final tightening of the nut of the rear suspension mounting bolts is carried out with the machine standing on the ground. At the end of the installation, it is necessary to bleed the brake system, carefully adjust the parking brake.
WHA